
Over time, you may find yourself in situations where your gear is wet and you need it dry for your next adventure. This guide will walk you through effective methods to dry your wet gear overnight, ensuring you are prepared without compromising your safety or comfort. With a few clever tricks and the right approach, you can tackle damp clothing and equipment to keep your spirits high. Dive into these practical strategies to give your gear the best chance at drying quickly and efficiently.
The Essential Prep: What to Do Before Bed
Your evening preparation can make all the difference in getting your wet gear dry by morning. Firstly, gather all your damp items and ensure they are all in one place. Evaluate the fabric types and the severity of the wetness, as different materials may require specific methods for effective drying. Carefully check pockets and compartments for any leftover moisture, and empty them before you begin to implement your drying techniques.
Assessing the Damage: Identifying Wet Gear
Take a moment to examine each item of your gear thoroughly. Look for areas that are soaked versus those that may just feel damp. Items such as boots, jackets, and sleeping bags are common culprits for excess moisture, and identifying these specific areas can help you decide on the best course of action for drying.
Quick Fixes: Immediate Actions to Take
Act swiftly to combat the moisture in your gear. Start by wringing out any excess water; this can significantly reduce drying time. For small items, such as socks or gloves, a quick spin in the laundry machine can be effective. When dealing with larger items such as jackets or trousers, hanging them up in a well-ventilated space can facilitate evaporation. You might also consider placing items close to a heater or using a towel to absorb moisture effectively.
Utilising heat can greatly expedite your drying process, so if you have a portable fan or a dehumidifier, now is the time to employ them near your gear. Ensure that items don’t come into direct contact with the heater, as this could risk damage. For particularly stubborn wet gear, consider layering with dry towels or using a hairdryer on a cool setting to help extract moisture without harming the fabric. Combining these immediate actions can provide a significant advantage in your overnight drying endeavour.
The Right Tools for Quick Drying
Having the right tools at your disposal makes drying wet gear overnight much easier. Look for portable camping heaters or foldable drying racks that can be set up in tight spaces. Additionally, investing in a high-quality blow dryer or fan can provide the airflow needed to speed up the drying process significantly. With the right set of tools, you can dramatically reduce waiting time and ensure your gear is ready to hit the road again when you are.
Best Gadgets and Gear for Drying Efficiently
Some of the most effective tools for efficient drying include electric shoe dryers, which can take care of your wet footwear overnight, and drying bags specifically designed to wick moisture away. Equip yourself with a dehumidifier for enclosed spaces, as this will help to absorb moisture and improve air circulation, ultimately drying your gear more quickly.
DIY Solutions: Household Items that Work Wonders
Household items can provide ingenious solutions for drying your gear effectively without needing to purchase expensive gadgets. Towels can be used to wring out excess moisture from clothes, and placing a wet item near a radiator or a fan heater can create a makeshift drying station. Additionally, hanging clothes in a warm bathroom after a hot shower can take advantage of steam to help with drying.
Try using a blotting technique with towels for a quick initial moisture removal. Simply lay the wet item flat on a towel, then roll it up tightly and apply pressure. The towel will absorb significant moisture before you even think about airflow or heat. Combine this method with a fan or hang your gear in a warm bathroom, and you’re on your way to having dry clothing before heading out again. Combining these practical tips allows you to be resourceful and effective while minimising dependence on specialised gear.
Leveraging Heat and Airflow: Optimal Drying Techniques
Utilising heat and airflow efficiently can transform the drying process for your wet gear. By placing your items in a well-ventilated area and incorporating heat sources, you significantly speed up moisture evaporation. A combination of warm air circulation from a fan and direct heat, such as a portable heater or drying rack, creates an ideal environment for quicker drying, making it possible to wake up to dry gear even in damp conditions.
The Science of Drying: How Heat Affects Moisture
Heat plays a vital role in the drying process, as it directly influences the moisture levels within materials. As temperatures rise, the air’s capacity to hold moisture increases, leading to quicker evaporation from your gear. This relationship explains why damp conditions prolong drying times, while warmer, drier environments can effectively wick away moisture, leaving your items ready for use by morning.
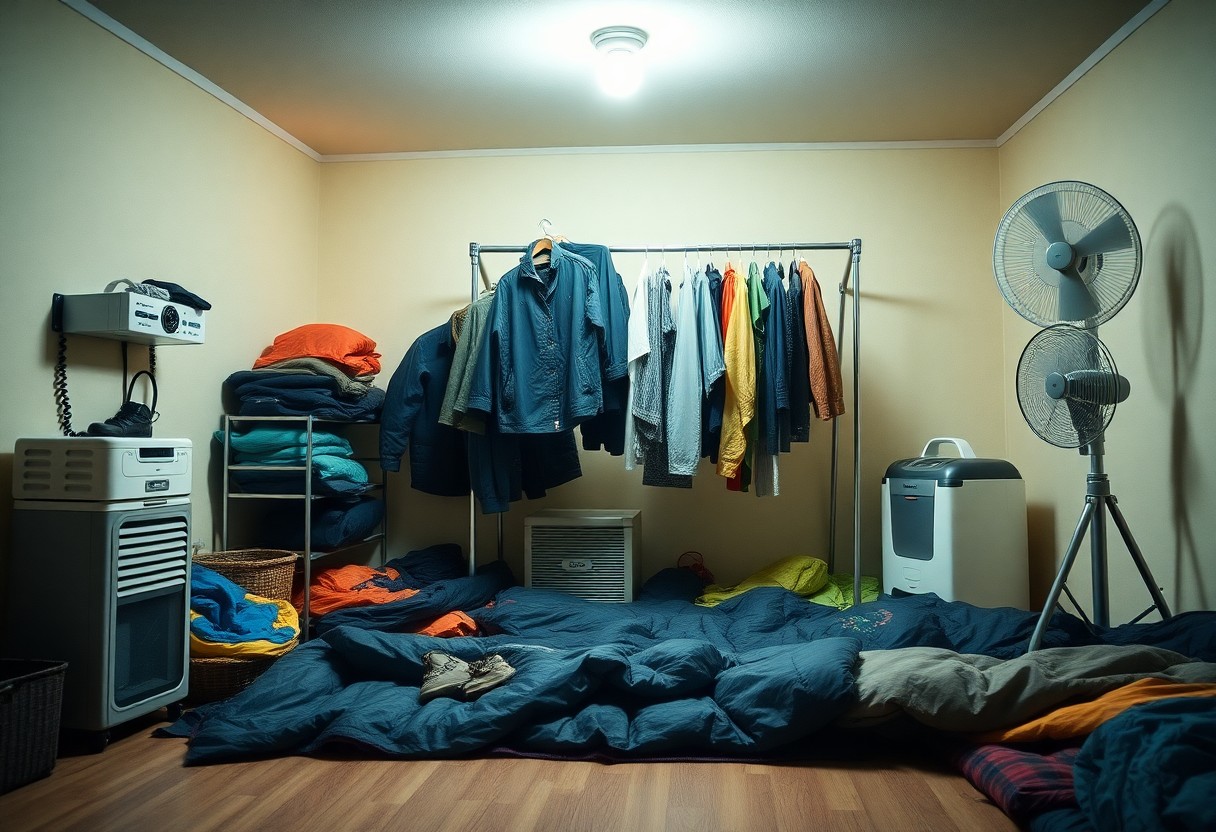
Creating a Controlled Environment: Fan Placement and Space Utilisation
Efficient fan placement and optimal utilisation of space directly impact the drying performance. Position your fans to maximise airflow over your gear, ideally at an angle that promotes air movement across wet surfaces. Ensure your items are not stacked or cramped together, as this obstructs airflow; instead, space them out to allow air to circulate freely around each piece. Elevating items off the ground can further enhance drying by allowing air to flow underneath as well.
Setting up your drying area strategically ensures that every aspect of your gear gets ample airflow. Place fans at opposite ends of the drying space to create a cross-current, which can effectively pull moisture away from all surfaces. If possible, elevate your gear on a rack or drying line to avoid contact with damp ground, which can hinder drying and introduce additional moisture. By giving each item enough room and optimal airflow, you can dramatically improve your overnight drying success.
Innovative Approaches: Unconventional Drying Methods
Exploring unconventional drying methods can yield surprising results. Think outside the box by employing techniques like using a portable fan to enhance airflow or wrapping wet items in a dry towel to absorb moisture quickly. Additionally, compressing gear in a vacuum bag can aid in significantly decreasing drying time by removing moisture and allowing for better air circulation. Each of these tips can make a significant difference when you’re in a pinch and need your equipment ready for the next adventure.
The Hitchhiker’s Guide to Drying Gear on the Go
When travelling, improvisation is key to drying your gear quickly. Utilising your backpack as a makeshift drying station can be effective; simply hang the wet items from the exterior while allowing airflow to do the work. Additionally, consider draping items over nearby objects, such as a picnic table or the back of a chair, to maximise exposure to the wind and sun. Adaptability in your approach can ensure you stay dry and prepared, no matter where your journey takes you.
Nature’s Help: Using Outdoor Elements for Speedy Drying
Harnessing the elements can significantly expedite the drying process. Sunny days and brisk winds are your allies in this endeavour. Simply laying out your wet gear in direct sunlight can evaporate moisture relatively quickly, while a windy day can whisk away lingering dampness. Additionally, creating a makeshift clothesline with paracord strung between trees or posts allows for maximum exposure to the elements. Even cold air can be beneficial if it’s coupled with air circulation, as long as items are not left in high humidity.
On warmer, sunny days, spreading your gear on a larger surface area aids in heat absorption and evaporation. A good rule of thumb is to avoid bunching items up; the more surface area exposed to sunlight and airflow, the faster they will dry. For items that are still damp after a bit of time, giving them a light shake can help to promote even more airflow. In cooler and cloudy conditions, seek out sheltered spots with natural ventilation where they can still catch a breeze, aiding the drying process even in less-than-ideal weather.
Preventative Strategies: Keeping Gear Dry in the First Place
Taking steps to keep your gear dry from the outset can save you a lot of hassle. Using waterproof bags or cases for your valuables ensures that even unexpected showers won’t spell disaster. It’s also wise to keep items off the ground, ideally in dry bags, to prevent soaking from wet grass or mud. Regularly treating your gear with water-resistant sprays can further enhance their ability to withstand moisture, turning your outdoor adventures into worry-free experiences.
Layering Techniques: Choosing the Right Fabrics
Selecting the right fabrics is imperative in keeping yourself dry. Look for moisture-wicking base layers that draw sweat away from your skin, combined with waterproof and breathable outer layers. Materials like Gore-Tex and similar innovations not only repel water but also allow perspiration to escape, helping you stay comfortable during outdoor activities. Synthetic materials often outperform natural fibres in wet conditions, offering better protection and quicker drying times.
Preparing for the Unexpected: Packing Smart for Wet Conditions
Smart packing can make all the difference when facing wet conditions. Always pack an emergency poncho or a lightweight waterproof jacket, ensuring you have a reliable means to shield yourself from the elements. Keep spare socks and gloves in waterproof bags to maintain warmth. When packing, prioritise items that must remain dry and secure them at the top of your rucksack for quick access. Incorporating a water-resistant cover for your pack can also provide an extra layer of protection against rain downpours.
By anticipating wet conditions, you reduce the likelihood of dealing with soggy gear. Use packing cubes to keep your items organised and ensure those prone to moisture exposure are separate from other imperatives. Invest in dry bags that can withstand splashes and immersion, especially for electronics. Keep your campsite setup in mind as well; placing a waterproof groundsheet beneath your tent can provide a reliable barrier against dampness. Such strategies will significantly improve your overall experience, keeping everything from your sleeping bag to your electronics safe and dry.
Summing up
Hence, drying your wet gear overnight can be effectively achieved by utilising various methods suited to your environment and the materials of your gear. Employing a combination of airing your items, using heat sources judiciously, and optimising airflow will significantly enhance your chances of waking up to dry equipment. Consider employing moisture-absorbing materials or seeking out dedicated drying solutions when necessary. By incorporating these strategies, you can ensure that your gear is ready for use the following day, allowing you to focus on your adventures without the worry of damp equipment.